- How-to
- Beginner
- Playwright (TypeScript)
Closing the Visual Gap
Part 2 of 3 in Visual AI Foundations · For QA engineers, SDETs, developers, and team leads · Reviewed Nov 9, 2026
Your functional tests already prove the logic works. This guide shows how to add visual assertions to those same tests so they also catch what users would see.
QA engineers and SDETs who have existing Playwright functional tests and want to add visual coverage. Read Why Visual AI Works first if you're new to visual testing.
- Node.js and a Playwright project with existing functional tests (or the ability to recreate the examples below).
- Applitools Eyes account and API key.
What Your Functional Tests Already Cover
Functional tests are critical for the SDLC. They drive the test, confirm logic, data, and flows behave as expected, and do so quickly and reliably. What functional tests don't reveal is whether the page looks right. As covered in Why Visual AI Works, functional assertions answer the question "did the app do what was expected?" while visual assertions answer "would a person see the difference?" A test can pass functional assertions while the user sees overlapping elements, unreadable text, or a button that is partly cut-off or even fully covered by other elements.
Visual testing complements functional testing and should be used in tandem.
Take the example of a shopping cart system below. It confirms the cart count updates, the page navigates, and the item appears in the cart. It would still pass functionally even if the count badge were hidden behind the logo, or if the checkout button turned white on a white background.
import { test, expect } from '@playwright/test';

test('adding a product updates the cart', async ({ page }) => {
  await page.goto('/products/trail-runner');
  await page.getByRole('button', { name: 'Add to cart' }).click();
  await expect(page.getByTestId('cart-count')).toHaveText('1');

  await page.getByRole('link', { name: 'Cart' }).click();
  await expect(page).toHaveURL(/\/cart$/);
  await expect(page.getByTestId('cart-item')).toBeVisible();
});
This guide shows you how to add visual assertions to tests like this one, so a single test covers both how your app works and how it looks.
Choose Where to Add Visual Assertions
The first step to implementing your visual validation for your site or app is to identify the most valuable comparisons to make. Typically, full-screen captures are the ideal approach to ensure you capture issues as users would see them.
In general, the most valuable screenshots are:
- Key pages
- States after important actions
- Components with heavy styling
- Flows that have shipped visual bugs before
Once you have this identified, you can begin to build your first visual assertion in Applitools.
Declaring Unique Tests for Comparison
There are five critical pieces of information that make up what defines a baseline.
- App Name: the name of the overall application being tested.
- Test Name: the name of the test itself.
- Operating System or Device: the system the test runs against.
- Browser: which browser the test is running on. (Does not apply for Native Mobile tests)
- Viewport: the dimensions of the screen we're capturing.
If any of these differ, a new baseline is captured and used as a comparison point for all matching tests going forward. This document will provide details on running against multiple combinations of devices, browsers, and viewports using the Applitools Ultrafast Grid in the "Expand & Grow" section.
Baseline and checkpoint terminology will be defined in this document under "Run The Tests."
Add Your First Visual Assertion
The example code below is Playwright Fixture-focused, but illustrates a clear method for implementing your visual checks alongside your functional ones. It represents functional and visual assertions against a shopping cart flow.
This example illustrates running a simple local Playwright test without the advanced features of Applitools Eyes, such as coded regions or Ultrafast Grid implementation for multiple browser, OS, and viewport tests. The beauty of Eyes is the simplicity of getting started and how easy it is to scale beyond the bare basics. We have a configuration block and we have one line calling the eyes.check() method, which takes the full-page screenshot and does the work of uploading to Applitools Eyes for comparison.
import { defineConfig } from '@playwright/test';
import { EyesFixture } from '@applitools/eyes-playwright/fixture';

export default defineConfig<EyesFixture>({
  reporter: '@applitools/eyes-playwright/reporter',
  use: {
    baseURL: process.env.BASE_URL,
    eyesConfig: {
      apiKey: process.env.APPLITOOLS_API_KEY, // set in your environment, never hardcoded
      appName: 'Storefront',
      batch: { name: 'Cart Regression' },
      failTestsOnDiff: 'afterEach',
    },
  },
});
import { test, expect } from '@applitools/eyes-playwright/fixture';

test('adding a product updates the cart', async ({ page, eyes }) => {
  await page.goto('/products/trail-runner');

  // Functional: the behavior works
  await page.getByRole('button', { name: 'Add to cart' }).click();
  await expect(page.getByTestId('cart-count')).toHaveText('1');

  await page.getByRole('link', { name: 'Cart' }).click();
  await expect(page).toHaveURL(/\/cart$/);
  await expect(page.getByTestId('cart-item')).toBeVisible();

  // Visual: the page looks right
  await eyes.check('Cart with one item', { fully: true });
});
Scope and Place Visual Assertions
Check the full page by default. A full-page visual test covers everything on-screen, including details you didn't think to assert specifically. Element-specific checks can be used when testing single components, such as headers, modals, or product cards. Often this works best using component-level tools such as Storybook.
await eyes.check('Cart summary', { region: page.getByTestId('cart-summary') });
Checks on specific elements only cover what's inside the element. Don't narrow a check just to avoid differences elsewhere on a page.
Check after the page settles. Once the page looks the way a user would see it, capture the visual assertion. Existing functional assertions work well as waits: in the cart test, toBeVisible() makes sure the cart item has been rendered before Eyes takes the screenshot. Another available tool is Lazy Loading, where you can have dynamically-loaded elements pre-render before taking an assertion.
Add one visual assertion per meaningful state. Add a visual assertion whenever the UI changes in a way a user would notice, such as a new page, opened modal, or error message. There's no need for a visual assertion after every action unless it meaningfully changes the state.
See the Do and Don't section below for a quick reference.
Handle Dynamic Content
On current SDK versions, the Dynamic match level is applied by default when no match level is specified. This match level ignores the values inside common text patterns, such as dates, email addresses, or URLs, while still checking that they're valid. Custom patterns can be defined via regular expressions.
Additionally, you can add Regions to apply specific Match Levels to specified sections of a capture.
More information is available in the first part of this series, Why Visual AI Works.
Run The Tests
When running an initial test with the visual assertions implemented, notice it is initially marked New and its checkpoints are now the baseline.
If SDK settings have been changed it may not be accepted by default. This document assumes the default setting to auto-accept initial checkpoints as the baseline is enabled.
The baseline is the known-good, accepted point of reference. You could call this your "golden image." This is what all future test runs will be compared against. When a checkpoint is accepted, it becomes the new baseline going forward.
The checkpoint is a screenshot taken for comparison against the baseline. This can be Accepted to become the new baseline, or Rejected to maintain the existing baseline.
On later runs, Eyes compares each new checkpoint to the baseline. If it finds no visible differences, the test passes. If it finds differences, the test is marked Unresolved for you to review:
- Accept if the change is intended. The checkpoint becomes the new baseline.
- Reject if the change is a bug. The baseline stays as it was.

Differences are highlighted in a pink color for clarity, as in the example below.
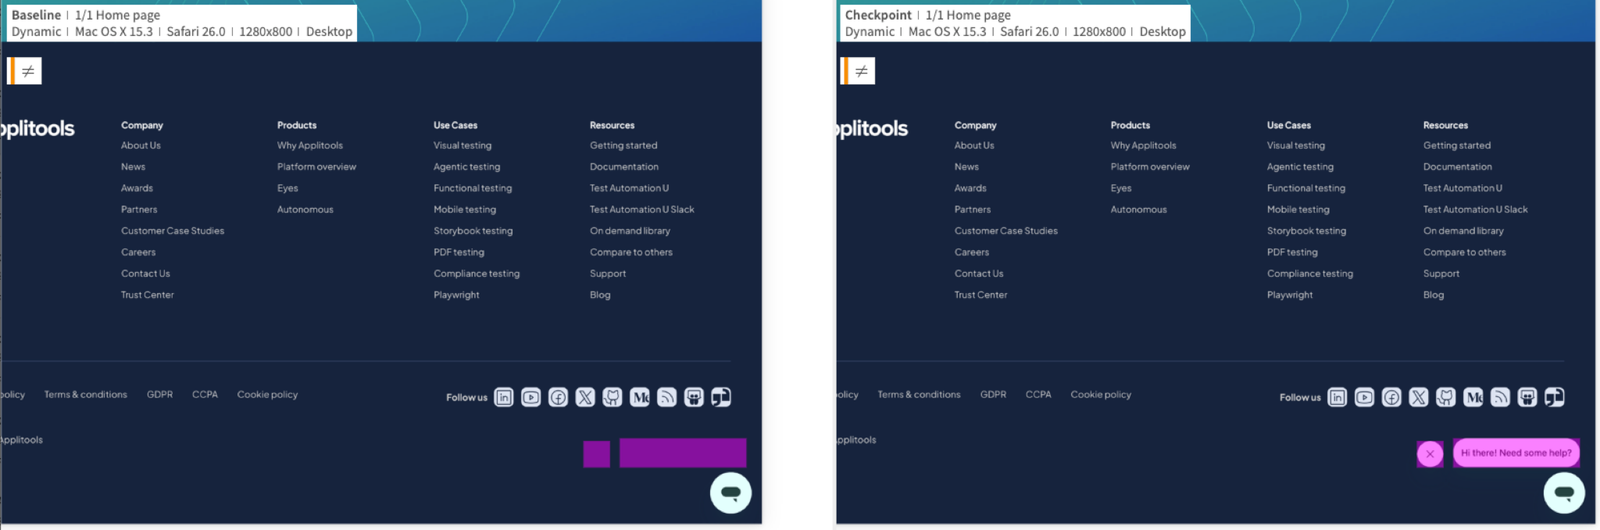
The statuses of tests vary. This is fully outlined in this document covering Test Statuses.
Expand & Grow
The quickest way to get started is to add a visual assertion to a single test in one existing suite. Pick a suite that covers a key flow, or one where visual bugs have slipped through before. Run it a few times to ensure baseline stability (such as loading issues), get comfortable reviewing results, determine if regions should be added, then expand to the rest of the suite.
Ultrafast Grid
The Ultrafast Grid is Applitools' browser environment for running visual tests against multiple browsers, operating systems, and viewports, with built-in support for device profiles for emulated runs, such as Apple's iOS devices and an array of some of the most popular Android devices.
Consider the Ultrafast Grid when:
- Users are spread across browsers or devices
- The application has shipped responsive or cross-browser layout bugs before
- Maintaining separate Playwright projects for each browser
- The application under test has responsive breakpoints
Implementation of grid usage in tests is straightforward. Take the cart example previously built. To scale it, update only the Playwright config:
import { defineConfig } from '@playwright/test';
import { EyesFixture } from '@applitools/eyes-playwright/fixture';

export default defineConfig<EyesFixture>({
  reporter: '@applitools/eyes-playwright/reporter',
  use: {
    baseURL: process.env.BASE_URL,
    eyesConfig: {
      apiKey: process.env.APPLITOOLS_API_KEY,
      appName: 'Storefront',
      batch: { name: 'Cart Regression' },
      failTestsOnDiff: 'afterEach',
      // Ultrafast Grid: render each visual assertion on every target below
      type: 'ufg',
      browsersInfo: [
        { name: 'chrome', width: 1440, height: 900 },
        { name: 'firefox', width: 1440, height: 900 },
        { name: 'safari', width: 1440, height: 900 },
        { name: 'chrome', width: 768, height: 1024 },
        { iosDeviceInfo: { deviceName: 'iPad (9th generation)' } },
        { chromeEmulationInfo: { deviceName: 'Pixel 4 XL' } },
      ],
    },
  },
});
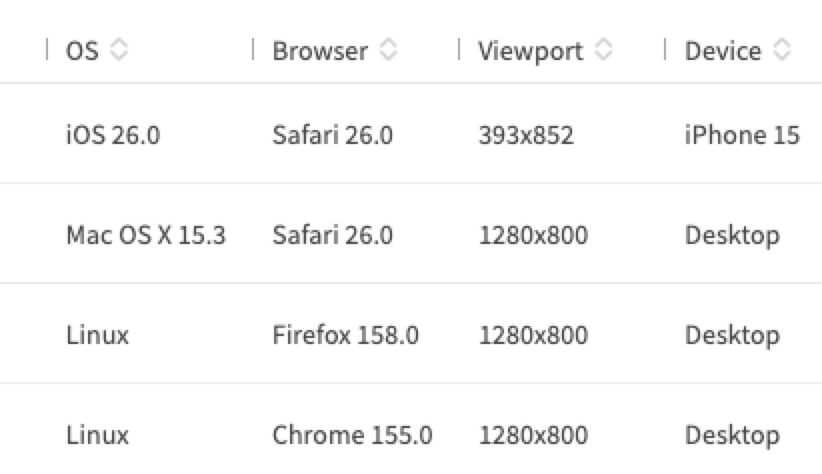
With just a few extra lines in our configuration code, the test now covers 4 desktop browser and viewport combinations, an iPad, and an Android device. Each combination gets its own baseline, so future test runs will compare against them. See Declaring Unique Tests for Comparison for more information.
Do and Don't
| Do ✅ | Don't 🚫 |
|---|---|
| Use full-page checks by default | Narrow to an element to avoid differences while ignoring other content |
| Check after a web-first assertion confirms the page is ready | Use Playwright's waitForTimeout() before a check |
| Give tests and steps descriptive names ("Cart with one item") | Name tests and steps generically ("Step 4") or by environment (mobile, desktop, stage, prod, etc.) |
| Check each state a user would notice | Check after every click |
Key Takeaways
- Functional and visual assertions work together. Keep functional assertions for behavior that isn't rendered (redirects, API response, backend state), and add visual checks to confirm the format but not the value.
- After adding a one-time config block for the project, adding a visual assertion takes one line of code.
- Check full pages by default, after the page settles, once per meaningful state.
- The first run creates the baseline. Later runs are compared against it, and differences are accepted or rejected.
- Scaling to more browsers and devices with the Ultrafast Grid is a config change, not a code change.
Up next: Your First 30 Days