User Actions
The Autonomous Natural Language Processing (NLP) engine allows you to
effortlessly create a custom flow test using simple, everyday language.
This powerful technology lets you define steps using common English
phrases like "Browse to http://example.com/" or "Click the OK button"
without any coding required. You can include
variables or
parameters in a test to allow you to run the
test in different scenarios.
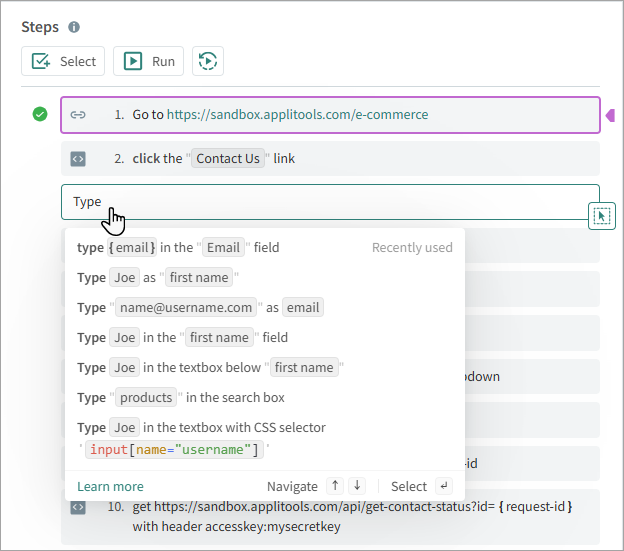
As you enter instructions for a step, Autonomous provides helpful suggestions to guide you through the process.
Auto-Correction
The system automatically corrects syntax errors and divides complex steps into multiple simple steps, making them easier to read and understand. The Auto-Correct feature makes the following corrections to commands:
- Grammar and Spelling – For example,
"Clack OK"will automatically be corrected to"Click OK". - Break Down Complex Steps – Steps with multiple actions will be broken down into shorter, more
manageable steps. For example,
"Enter 'John' in 'User name' and click OK"will be divided into:
Enter 'John' in 'User name'Click 'OK'
- Simplify and Standardize Commands – Steps will be modified to ensure consistency and clarity across all
steps. For example,
"In the user name field, enter 'John Smith'"will be changed to"Type 'John Smith' in the 'User Name'".
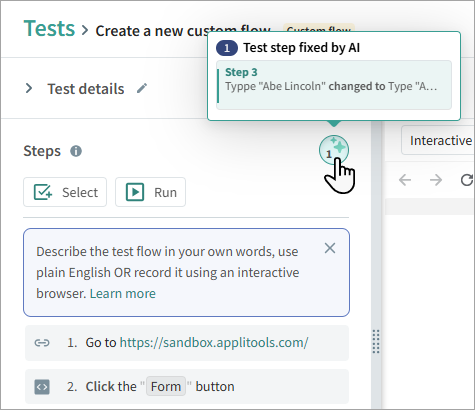
If steps were corrected, the
![]() icon indicates the number of
corrections made. Hover over the icon to view details of the changes.
icon indicates the number of
corrections made. Hover over the icon to view details of the changes.
Examples
Below are examples illustrating how easy it is to create tests using Natural Language Processing. Notice how the commands are written in straightforward English, making them accessible even to those without programming or technical expertise.
Fill Out a Form
Go to https://sandbox.applitools.com/
Click "Form"
Type "Jane Smith" in the "Your Name" field
Enter "janesmith@example.com" in the "Email" field
select "Technical Assistance" from dropdown below "Contact Reason"
Press ENTER
Click "Submit"
Open E-Commerce Page and Add Item to Cart
Go to https://sandbox.applitools.com/
Click "E-Commerce App"
Click "Outdoors"
Click "Small Succulent Planter Pot"
Select the second option from the "Variants" dropdown
Click "Increment"
Click "Add to cart"
Entering Instructions
When entering an action, identify a screen element, such as a button, text box, or image, and then specify what to do with that element, such as click, hover, or enter text.
Elements
Elements on the page can be identified in various ways, including:
- Text label, for example,
"Get Started" button. - Position in a list, for example,
"The third item in the Language list". - CSS Selector or X-Path selector ID, for example,
"gh-minicart-hover". - Position in relation to another item, for example,
Checkbox to the right of "I agree". - Location on the page, for example
button at the top of the page.
Screen elements with more than one word should be in quotation marks ("...").
Common Commands
Here are examples of common commands that the NLP engine supports. This is not a complete list, as there is no limit to the types of commands you can create.
| Command | Definition | Examples |
|---|---|---|
| Click on a screen item identified by text, location, or aCSS Selector or X-Path selector ID |
|
| Types text in a field |
|
| Select an item from a drop-down list |
|
| Opens a URL. The system automatically enters this as the first step in the test. |
|
| Scrolls the screen up, down, left, or right. |
|
| Selects or clears a checkbox. |
|
| Positions the pointer over a screen element, this is useful to capture a tooltip or to select an item from a popup menu. |
|
| Removes text from a field. |
|
| Presses a keyboard key. |
|
| Refreshes the page. A hard refresh clears cached data when the page is refreshed. This is the equivalent of pressing CTRL+F5 |
|
| Waits before performing an action. This is useful if it may take time for a page to load or for a page with lazyload functionality. (See below implicit and explicit waits) |
|
| Explicitly waits for a specific element or all elements to load. The system times out only after the defined period. This is useful for pages that are slow to load. |
|
| In all subsequent test steps, implicitly waits for the maximum defined time for an element to become visible before attempting to interact with it or assert on it. If the target element does not become visible within the specified time, the step will fail with an "element not found" error. The default implicit wait time is 10 seconds. |
|
| Performs an action on a popup window that opens over the page |
|
| Clicks the browser Back or Forward button to go back to the previous page visited or forward to the next one |
|
| Changes the view to a different tab. This command is only valid if there is more than one tab open, for example a tab was opened in a previous step. |
|
| Closes the current browser tab. This command is only valid if more than one tab is open. |
|
| Attempts to run the step, but if the step does not run successfully, continues to the next step without failing the test. |
|
| Attempts to run the step before all other steps. If the step does not run successfully, continues to the next step without failing the test. |
|
| Cancels a pre-step and stops it from running in subsequent steps |
|
| Runs a sub-test. For details, see Reusable Flow |
|
| Dismisses native browser JavaScript alerts. Accepting the alert is the equivalent of clicking "OK" in the alert, while closing the alert is the equivalent of clicking "Cancel" in the alert. |
|
| Tables and grid structures can be interacted with using natural language. Users can reference entire tables, specific rows, columns, or individual cells. This enables verification and interaction with structured data in tables. |
|
| Use the Upload File action to upload and use files in your test flows. See Upload File for details. |
|
Masking Secret Test Data
If a step includes sensitive information, such as a password, PIN number, credit card number, or a URL with basic authentication, when you save the test, the sensitive data is stored encrypted on the server and masked in the interface. If the field is not automatically masked based on the name of the field, enter "Secret" before the field value to indicate that it should be masked. Once a secret value has been masked, there is no way to retrieve the value from the system.
In the following examples, the bold text will be masked:
Type "My-PASS" in the password field
Type secret "My-PASS" in "Value1" field
Navigate to
"https://Username:**My-PASS**@autonomous-demo.applitools.com/basicAuth"
Upload File
Autonomous supports file upload steps in custom flow tests. Upload your files to the File Management Dashboard to manage them, then start authoring tests that include file upload steps. When you create a file upload step, the system automatically detects that you need to upload a file and prompts you to select a file from the dashboard or upload a new one. Once you've uploaded a file, you can reuse it across tests without needing to upload it again.
You can:
- Select files you have already uploaded during test authoring
- Reuse these files across tests
Add a file upload step during test authoring
- Create or open a custom flow test (go to Tests, click Create a new test, then select Custom flow; or click an existing test name).
- In the test editor, enter a Start URL and a Test name, then type or record the steps that lead up to the file upload action.
- When the step requires a file upload, click your application's upload button or file input in the interactive browser. Autonomous intercepts the native picker and shows the File upload detected modal.

- In the modal, do one of the following:
- Select an already-uploaded file from the list.
- Click Manage your files to open the File Management Dashboard in a new tab, upload your file there, then return to the test tab and select the file.
- Confirm your selection to upload the file to your application.
- Continue authoring the remaining steps, then click Create & run (new test) or Update & run (existing test).
NLP command examples
You can also type file upload steps directly into the step text box using natural language. Supported phrasings include:
upload file "contract_signed.pdf"
attach file "employee_data.csv"
attach file "employee_data.csv" from the file input
select file "project_plan.docx"
select file "project_plan.docx" in the file chooser
add file "readme.md"
import file "dataset.csv"
pick file "server_logs.log"
pick file "server_logs.log" in the file picker
choose file "resume_final.pdf"
choose file "resume_final.pdf" in the file picker
Native Validation Support
Autonomous preserves any constraints declared on the file input element. For example, if the input specifies accept="image/png,application/pdf", only files of those types are accepted.
You can upload only one file at a time.
XPath Elements
When recording a test in the interactive browser, there may be rare
situations where the recorder is unable to assign a clear English name to
a screen element. In this case, the recorder will identify the element
with its XPath, which may be a long string of code, such as
/HTML[1]/BODY[1]/DIV[5]/DIV[1]/MAIN[1]/DIV[2]/DIV[3]/DIV[4]/FIELDSET[1]/DIV[1]/DIV[3]/LABEL[1].
This can make the test more difficult to read; however, the test will still run successfully, and regular functionality, such as self-healing, will be applied to the element.
If you need to refer to the element in other steps in the test, you should identify it with the XPath. For example:
Click the "OK button" with the XPath selector
"/HTML[1]/BODY[1]/DIV[5]/DIV[1]/MAIN[1]/DIV[2]/DIV[3]/DIV[4]/FIELDSET[1]/DIV[1]/DIV[3]/LABEL[1]"
Advanced Options
A custom flow test can also include the following advanced commands: